Spring Boot Fundamentals: A Deep Dive into JPA, ORM, and Hibernate

Imagine you’re tasked with building an employee management system where a manager can:
- View employees in a specific department.
- Update their details.
- Ensure concurrent requests don’t overwrite each other.
Seems straightforward, right? But as you start implementing this, questions arise:
- How do we translate user-friendly queries into database-friendly SQL?
- Can we avoid repeatedly querying the database for the same data?
- What happens when multiple users update the same record simultaneously?
This blog is a journey through these challenges and how ORM in Spring Boot resolves them using Hibernate, JPQL, transactions, and caching.
The First Step: Fetching Employees
Suppose, you’ve written a repository method to fetch employees by department:
public interface EmployeeRepository extends JpaRepository<Employee, Long> {
    List<Employee> findByDepartment(String department);
}
When a manager makes a request to /employees?department=IT, what happens under the hood?
The JPQL-to-SQL Journey
Step 1: Dynamic Query Methods and JPQL
Spring Data JPA dynamically generates JPQL queries for repository methods based on method names, such as findByDepartment:
SELECT e FROM Employee e WHERE e.department = :department- JPQL (Java Persistence Query Language) is an object-oriented query language that works with entity objects instead of database tables.
- This abstraction allows you to focus on domain models rather than worrying about database schema details.
Step 2: JPQL to Abstract Syntax Tree (AST)
When you execute a JPQL query, Hibernate parses it into an Abstract Syntax Tree (AST):
- Purpose of AST: It represents the query structure (e.g., SELECT clause, WHERE clause) in a tree-like format.
- Hibernate uses the AST to understand the query’s intent in terms of the entities involved, their relationships, and criteria.
Step 3: AST to SQL Translation
Hibernate takes the AST and translates it into SQL using:
- Entity Metadata: Hibernate maps entity classes, fields, and relationships to their corresponding database tables and columns.
- Dialect-Specific Adjustments: Hibernate applies database-specific optimizations based on the configured dialect (e.g., MySQL, PostgreSQL).
Example SQL:
SELECT * FROM employees WHERE department = ?3. Once the SQL is generated the responsibility to execute the query is passed on to the JDBC.
One thing to understand is that not always JPQL is generated, sometimes this process is entirely skipped. Why of this is explained below.
When JPQL Is Skipped
Not all queries go through the JPQL-to-SQL journey. Here are some scenarios where Hibernate generates SQL directly:
1. Native Queries
- When you explicitly define a native query, JPQL is bypassed entirely.
Example:
@Query(value = "SELECT * FROM employees WHERE department = :department", nativeQuery = true)
List<Employee> findByDepartmentNative(@Param("department") String department);- Here, the SQL is executed as provided, with no JPQL or AST parsing involved.
2. CRUD Operations (e.g., save() or delete())
- Hibernate directly generates SQL for entity operations like
persist()andremove()based on entity metadata.
Example:
For the following query
Employee emp = new Employee("John", "IT", 5000);
entityManager.persist(emp);
Hibernate generates:
INSERT INTO employees (name, department, salary) VALUES (?, ?, ?)Key Differences: JPQL vs. Direct SQL Generation
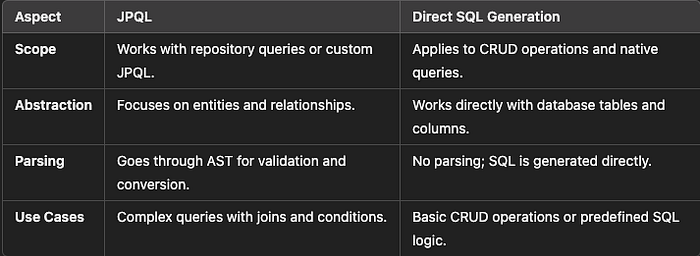
Why Does Hibernate Use AST for JPQL?
The AST ensures that:
- Query Validation: Hibernate checks if the JPQL is syntactically and semantically correct before generating SQL.
- Database Independence: The AST abstracts the query’s structure, allowing Hibernate to generate dialect-specific SQL without changing the JPQL.
Now that we have seen how the query is executed, it is time we understand how the Hibernate works to optimise the whole process.
Caching the Results
Imagine a manager requests employee details twice in a single API call — should the application hit the database twice? Hibernate’s first-level cache (PersistenceContext) prevents redundant queries by storing entities retrieved or modified within a transaction. Let’s see how it works.
The First-Level Cache: Hibernate’s Local Memory
Hibernate’s first-level cache is integral to how it manages entities. It:
- Is Transaction-Scoped: Each API call gets its own
EntityManager, and with it, a separate first-level cache. - Works Automatically: There’s no need for additional configuration — it’s built into Hibernate’s core.
How It Works: Multiple Calls in the Same Transaction
@Transactional
public void processEmployee(Long id) {
    Employee emp1 = entityManager.find(Employee.class, id); // Hits DB
    Employee emp2 = entityManager.find(Employee.class, id); // Uses Cache
    System.out.println(emp1 == emp2); // true
}- First Call: Queries the database and caches the result in the PersistenceContext.
- Second Call: Returns the cached entity, avoiding a redundant database query.
Key Insight: The cache ensures consistency within the transaction. Updates to
emp1are visible inemp2because they’re the same instance.
Managing EntityManager in Spring Boot
Spring Boot uses @PersistenceContext to inject the EntityManager. This ensures:
- A proxy is injected, which dynamically resolves to a transaction-specific
EntityManager. - Thread Safety: Each transaction operates on its own
EntityManager, preventing data inconsistencies across threads. - No Application-Wide Caching: Each transaction has its own first-level cache, isolated from others.
Example: Using the Proxy
@PersistenceContext
private EntityManager entityManager;

@Transactional
public void updateEmployee(Long id, String newDept) {
    Employee emp = entityManager.find(Employee.class, id); // Proxy resolves to transaction-specific EntityManager
    emp.setDepartment(newDept);
    entityManager.flush(); // Synchronizes changes with the database
}
Here’s what happens:
- The proxy resolves to the active transaction’s
EntityManager. - The entity is fetched and cached in the first-level cache.
- Changes to the entity are tracked, and updates are committed to the database when the transaction completes.
Key Insight: While the proxy is a singleton, the
EntityManagerit resolves to is transaction-specific. This guarantees that no data is shared across transactions.
Crossing Transactions: Cache Scope
The first-level cache doesn’t persist beyond a transaction. If another API call modifies the same entity during a different transaction, the cached data in the first transaction remains unaffected.
Example: Separate Transactions
public void apiCallOne() {
    Employee emp1 = entityManager.find(Employee.class, 5); // Hits DB
}

public void apiCallTwo() {
    Employee emp2 = entityManager.find(Employee.class, 5); // Hits DB again
}- First Transaction: Queries the database and caches the result.
- Second Transaction: Queries the database again because the first-level cache is not shared across transactions.
Key Insight: This isolation ensures thread safety and transactional consistency.
The Role of Transaction Isolation Levels
Concurrency behavior is further influenced by the database’s transaction isolation level. Spring Boot defaults to READ_COMMITTED, but other levels provide varying degrees of consistency and performance trade-offs.
Transaction Isolation Levels Explained
- READ_COMMITTED (Default):
- Prevents dirty reads. One transaction cannot see uncommitted changes from another.
- Changes from one transaction become visible to others only after commit.
2. REPEATABLE_READ:
- Ensures that data read during a transaction remains consistent, even if another transaction updates it.
- Prevents non-repeatable reads but may result in increased locking.
3. SERIALIZABLE:
- The strictest level of isolation. Transactions are executed in sequence, blocking others until the current one completes.
- Ensures full consistency but significantly reduces concurrency.
Key Insight: Isolation levels dictate how transactions interact with the first-level cache and influence the visibility of changes.
Concurrency and Cache Behavior
Concurrency becomes critical when multiple transactions access the same entity. Let’s revisit the case of two managers:
- Manager 1: Fetches employee details and updates their department in API Call 1.
- Manager 2: Simultaneously updates the same employee’s salary in API Call 2.
Potential Problem: Lost Updates
- API Call 1 caches the employee and commits changes.
- API Call 2, unaware of the changes, overwrites them with stale data.
Strategies to Prevent Lost Updates
- Optimistic Locking:
- Add a
@Versionfield to detect concurrent modifications.
@Version
private Integer version;- Hibernate throws an exception if the versions mismatch during commit.
2. Pessimistic Locking:
- Lock the entity during fetch to prevent updates by other transactions.
Employee emp = entityManager.find(Employee.class, id, LockModeType.PESSIMISTIC_WRITE);3. Manual Refresh:
- Discard stale data by refreshing the entity from the database.
entityManager.refresh(emp);Transactions in Depth
Transactions are the backbone of consistency in ORM. Adding a detailed explanation of how transactions work can bridge the concepts of caching, concurrency, and lifecycle.
How Transactions Work in Spring Boot
- Transactional Boundaries:
- A transaction begins when the API call starts (triggered by
@Transactional). - All operations within the method are part of the same transaction.
- The transaction commits when the method ends, synchronizing changes to the database.
2. Transaction Propagation:
- Spring Boot allows controlling how transactions interact using propagation settings like
REQUIREDorREQUIRES_NEW.
Example: Nested Transactions
@Transactional
public void outerTransaction() {
    updateEmployee();
}

@Transactional(propagation = Propagation.REQUIRES_NEW)
public void updateEmployee() {
    Employee emp = entityManager.find(Employee.class, 5);
    emp.setDepartment("HR");
    entityManager.flush();
}
In this example:
outerTransactionandupdateEmployeeare two separate transactions because ofPropagation.REQUIRES_NEW.- Changes in
updateEmployeeare committed independently.
Key Insight: Transactions provide atomicity and consistency, ensuring no partial changes are saved to the database.
We will have a more deeper dive in Transactions in the blogs to follow, this is just for basic context setting.
Proxy and Same-Class Method Calls
One important nuance in Spring’s transaction management is the use of proxies. When you annotate a method with @Transactional, Spring creates a proxy around the bean to handle transactional behavior.
What Happens with Internal Method Calls?
If a @Transactional method in a class calls another @Transactional method within the same class, the call bypasses the proxy and goes directly to the actual method. As a result:
- The transactional behavior (e.g., starting a new transaction or applying
Propagation.REQUIRES_NEW) of the inner method is not applied. - Both methods operate within the context of the outer method’s transaction.
@Transactional
public void outerTransaction() {
    System.out.println("Outer transaction started");
    innerTransaction();
}

@Transactional(propagation = Propagation.REQUIRES_NEW)
public void innerTransaction() {
    System.out.println("Inner transaction started");
}
What Happens:
outerTransactionstarts a transaction.innerTransactionis called directly without going through the proxy.- The
REQUIRES_NEWpropagation oninnerTransactionis ignored, and it runs within the same transaction asouterTransaction.
How to Avoid Proxy Bypass
To ensure the transactional behavior of the inner method is applied, you can:
- Move the inner method to another service class:
- When
outerTransactioncalls the inner method via another bean, the proxy intercepts the call, and transactional behavior is applied.
@Service
public class OuterService {

    @Autowired
    private InnerService innerService;

    @Transactional
    public void outerTransaction() {
        innerService.innerTransaction();
    }
}

@Service
public class InnerService {

    @Transactional(propagation = Propagation.REQUIRES_NEW)
    public void innerTransaction() {
        System.out.println("Inner transaction started");
    }
}
2. Use Programmatic Transaction Management:
- Manually manage transactions using
TransactionTemplateorPlatformTransactionManagerfor fine-grained control.
Conclusion
In this blog, we’ve unraveled the foundational concepts of ORM in Spring Boot, gaining insight into how Hibernate and JPA work together seamlessly. From the translation of JPQL into SQL to the optimization provided by first-level caching and the intricacies of transaction management, we’ve seen how Spring Boot simplifies complex database operations.
Here’s a quick recap of what we’ve explored:
- Query Execution: How JPQL is parsed into SQL and validated for database independence.
- Caching: The role of Hibernate’s first-level cache in avoiding redundant queries within a transaction.
- Transactions: Managing atomicity and consistency through transaction boundaries and propagation.
- Concurrency: Strategies to handle conflicts with techniques like optimistic and pessimistic locking.
This is just the beginning of our journey into mastering ORM. In the next blog, we’ll dive deeper into advanced topics such as:
- Relationship mapping with
@OneToManyand@ManyToOne. - Leveraging second-level caching for global data sharing.
- Query optimization techniques to fine-tune your application’s performance.
- How
PersistenceContextoperates under the hood, ensuring efficient data management.
With these upcoming concepts, you’ll be equipped to build highly scalable and robust data-driven applications. Stay tuned for more! 🚀